Programmatic GUI customization for template matching
Contents
Template matching GUI
The GUI for chunk manipulation is dtmslice with a tomogram as input. It has a tab called Template Matching in the top bar of the GUI. It is through this tab that general attributes of chunks distributions and TM processes can be manipulated. Additionally, each chunk has its own attributes (such as position and size) that can be manipulated after they are created. More information on how to use the GUI can be found in the GUI walkthrough.
Programmatic addition of GUI functionalities
The GUI for chunk manipulation can be used to conveniently define oriented regions of a tomogram. While this functionality has been mainly intended to be used to create tessellations from template matching procedures, its has been designed so that these tools can be integrated in other procedures. In this walkthrough, two ways to add custom functionalities to the GUI will be presented with practical examples.
Data set
Getting the data
Currently the data necessary to tun this walkthrough can be downloaded using the link:
https://saco.csic.es/s/SmymKiHxswSoyoP
It consists in: a tomogram fullReconstructionWBPCTFDW.mrc, a template templateMCP.mrc, a mask maskMCP.mrc, a fourier mask fmaskMCP.mrc and a tessellation file tesselation3.omd.
Tomogram description
The tomogram contains Bdellovibrio bacteriovorus acquired by fast-incremental method. The tomogram has been generated using the tilt series from EMPIAR dataset entry 10226. The pixel size is 2.743 Å. The tomogram has been generated around an area of the bacteria presenting methyl-accepting chemotaxis protein (MCP) arrays. The template an average of MCP array.
Acknowledgements
The tomogram has been generated using the tilt series from EMPIAR dataset entry 10226 described in the paper "Chreifi, G., Chen, S., Metskas, L. A., Kaplan, M., & Jensen, G. J. (2019b). Rapid tilt-series acquisition for electron cryotomography. Journal of Structural Biology, 205(2), 163–169. https://doi.org/10.1016/j.jsb.2018.12.008". The alignment and reconstruction was done using the Dynamo AWF procedure as detailed in "Coray, R., Navarro, P., Scaramuzza, S., Stahlberg, H., & Castaño-Díez, D. (2024). Automated fiducial-based alignment of cryo-electron tomography tilt series in Dynamo. Structure, 32(10), 1808-1819.e4. https://doi.org/10.1016/j.str.2024.07.003". The template has been generated by STA as described in the same paper.
Adding per-chunk functionality
The first way to add a functionality is to add it directly to a chunk object. This means a new action will be available when a chunk is right-clicked.
Functionality to add: chunk autocorrelation
Open a new text editor and copy the following code in a new file. Save the file as exampleChunkOption.m
% example of chunkOption
%
function exampleChunkOption(src)

h = mbs.oh('Extracting a chunk and computing its autocorrelation');

% IMPORTANT: links the menu with the chunk object.
% gets the chunk object
chunk = src.Parent.UserData.chunk;

% this is the method of the chunk object that actually fetches the content
% of the chunk
volume = chunk.cropper.getRotatedChunk();

volumeCorrelationOutput = dynamo_correlation(volume,volume);
dtmshow(volumeCorrelationOutput.cc_cube);


mbgraph.delete(h);
The function that has been just created computes the auto-correlation of a chunk with dynamo_correlation and shows the result with dtmshow.
Note the key operations:
- chunk = src.Parent.UserData.chunk; to access the chunk object.
- volume = chunk.cropper.getRotatedChunk() to extract the part of the tomogram included in the chunk. This is valid also for oblique chunks.
How to link functionality to chunks
The functionality can be added only to an already opened dtmslice GUI and will need to be reconnected if the GUI is closed and opened again.
First, open the dtmslice with the tomogram:
dtmslice('fullReconstructionWBPCTFDW.mrc');
Then connect the new functionality by running the following commands:
%% adds functionalities to TM menus

% gets the object that manages the TM in the open dpkslicer menu
tm = dpkslicer.tm.getManager();

%%%%%%%%%%%%%%%%%%%%%s
% defines the menu entry

myFunctionChunk = @(src,evnt)exampleChunkOption(src);
% myFunction is a "function handle" in Matlab
% - the "@(src,evnt)" characters are necessary to define the function handle
% - the "src" variable needs to be passed explicitely as input
%    (in the body of the function, src will be used to access the particular chunk )

tm.addMenuChunk('Show autocorrelation',myFunctionChunk,'Separator','On','Accelerator','A');
%
% the flags 'Separator','Accelerator' are part of regular Matlab syntax
% you can pass any flag accepted by the "uimenu" option of Matlab
%     (except 'Label' and 'Callback', which are the first entries)
%
Note the key operations:
- myFunctionChunk = @(src,evnt)exampleChunkOption(src) links the function defined in the file exampleChunkOption.m to a GUI event.
- tm.addMenuChunk('Show autocorrelation',myFunctionChunk,'Separator','On','Accelerator','A'); makes so that a new chunk menu options will be created that generates an event causing the function to be executed.
Testing chunk autocorrelation from GUI
First, load the given tessellation file tesselation3.omd in the GUI.
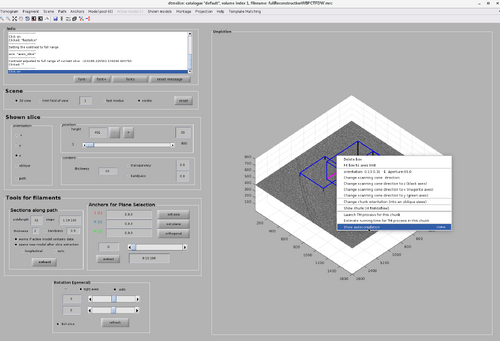
Then, right-click on the top chunk. The new functionality button will appear as in the following figure.
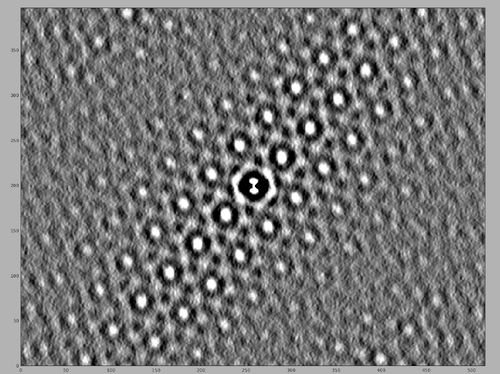
Click the button and inspect the resulting auto-correlation map. After ensuring better contrast, the resulting map will appear as the following image, highlighting the MCP array.
Adding global functionality
The second way to add a functionality is to add to the main TM chunk object manager. This means a new action will be available from the "Template Matching" option on the top bar of the GUI.
Functionality to add: lightweight tessellation depictor
Open a new text editor and copy the following code in a new file. Save the file as exampleGlobalOption.m
% example of globalOption
%
% The input object is the TM manager
%
function exampleGlobalOption(tm)

% the slicer TM  manager gives direct access to the cell array "chunks"
% each entry in this cell is a chunk object
n  = length(tm.chunks);

temporaryTable = dynamo_table_blank(n);
temporarySizes = zeros([n,3]);
for i=1:n

    % property 'l' in a chunk contains its sidelengths;
    l  = tm.chunks{i}.l;
    % property 'center' in a chunk contains its central position;
    chunkCentre = tm.chunks{i}.center;
    % property 'cone' in a chunk contains cone information;
    chunkConeOrientation = tm.chunks{i}.cone.orientation;
    % convert orientation vector to euler triplets
    chunkConeTriplet = dynamo_orientation2euler(chunkConeOrientation);
    % fill in temporary tessellation table
    temporaryTable(i,[7,8,9]) = chunkConeTriplet;
    temporaryTable(i,[24,25,26]) = chunkCentre;
    % and temporary chunk sizes
    temporarySizes(i,:) = l;
end

% plot tessellation with lightweight modelling plotter function
dpktomo.match.modelling.plotTesselation(temporaryTable,temporarySizes,'alpha',0.1);
The function that has been just created assembles the chunk information to create a temporary tessellation and shows it by calling dpktomo.match.modelling.plotTesselation.
Note the key operations:
- tm.chunks{i} to access the chunk object i.
- tm.chunks{i}.cone to access cone informations of that chunk.
How to link functionality to template matching GUI
Then connect the new functionality by running the following commands:
%% adds functionalities to TM menus

% gets the object that manages the TM in the open dpkslicer menu
tm = dpkslicer.tm.getManager();

%%%%%%%%%%%%%%%%%%%%%s
% defines the menu entry

myFunction = @(src,evnt)exampleGlobalOption(tm);
% myFunction is a "function handle" in Matlab
% - the "@(src,evnt)" characters are necessary to define the function handle
% - the "tm" variable needs to be passed explicitely as input


tm.addMenuGlobal('Plot tessellation with cone orientations',myFunction,'Separator','On','Accelerator','Q');
%
% the flags 'Separator','Accelerator' are part of regular Matlab syntax
% you can pass any flag accepted by the "uimenu" option of Matlab
%     (except 'Label' and 'Callback', which are the first entries)
%
Note the key operations:
- myFunction = @(src,evnt)exampleGlobalOption(tm); links the function defined in the file exampleGlobalOption.m to a GUI event.
- tm.addMenuGlobal('Plot tessellation with cone orientations',myFunction,'Separator','On','Accelerator','Q'); makes so that a new Template Matching menu options will be created that generates an event causing the function to be executed.
Testing new functionality from GUI
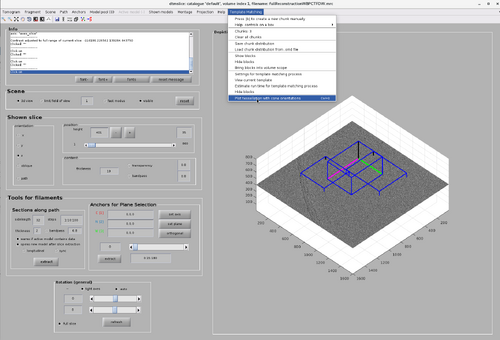
Click on the "Template Matching" option on the top bar of the GUI. The new functionality button will appear as in the following figure.


